

前回作った環境にDjangoを入れて使えるようにします。
Djangoは1.5からpython3に対応したので(まだ正式ではないようですが)試しにpython3環境で使ってみます。
構成は以下のようにする予定です。おそらくOSがLinuxでも大きな違いはないと思います。
OS:FreeBSD 9.1
python:3.3.2
django:1.5.1
webサーバー:nginx 1.4.1 + uwsgi 1.9.12
データベース:sqlite3 3.7.16.1
webサーバーとデータベースはこれを書いた現時点ではまだ使っていないのであとで変わるかもしれませんが一応予定ということで。
ところで、Djangoについては日本語で検索してもあまり記述を見かけないうえに、公式サイトのドキュメントに書いてあることだけを見ていると手順がいまいちよくわかりませんでした……
本を参考に自分でやったことを書いておくと後で使えそうなのでなるべく基本的なところから書いておくつもりです。なお以降で参考にしている本はこれです。3章の内容になります。
間違いなどあればコメントなどで指摘してもらえると助かります。

2008年に出た本で、Djangoのバージョンが0.96を基準に書かれているのでここで使おうとしている1.5.1とは若干違いがありますが、そこは新しい方の動作を見て適当に対応していきます。
Djangoのインストール
前回までの作業でpythonと仮想環境の作成まで行ったので、その仮想環境に入ってインストールします。
以下コマンドの記載はcshで操作したものなので、他のシェルの場合は読み替えてください。
%source bin/activate.csh
[testenv] %pip install django
これでDjango本体の仮想環境へのインストールは完了です。簡単。
プロジェクトの作成
Djangoをインストールするとdjango-admin.pyコマンドが使用できるようになります。
サイトはプロジェクトという単位で扱うようなので、以下のコマンドでtestprojectというプロジェクトを作ってみます。
testenv直下で
とするとtestprojectディレクトリが作成され、以下のファイルが追加されました。
testenv/testproject/manage.py
testenv/testproject/testproject/__init__.py
testenv/testproject/testproject/settings.py
testenv/testproject/testproject/urls.py
testenv/testproject/testproject/wsgi.py
本によれば以降は主にmanage.pyで操作するということなので、このコマンドに実行権限をつけて開発用のサーバを起動してみます。
[testenv] %./manage.py runserver
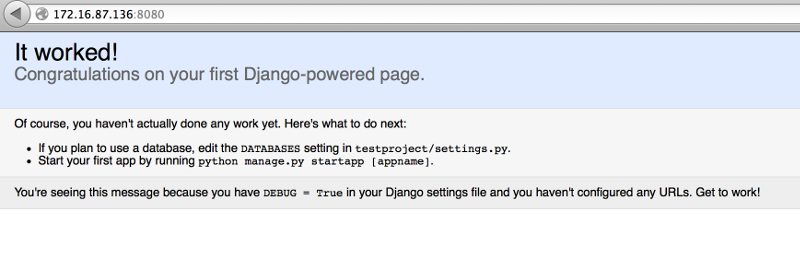
127.0.0.1にアクセスするとDjangoのデフォルトページが表示されます。Djangoを動かしているのとは別のマシンから見ているような場合は(まさに今FreeBSDはVMで動かしているので私の環境がそうですが)
とすればローカル以外からも見えるようになります。8080はポートを変更したい時のための指定。
ビューの作成と表示
とりあえず一番簡単な方法で表示を出してみます。
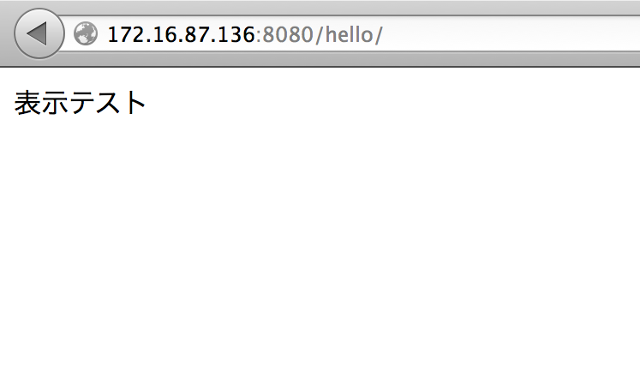
testproject直下に以下の内容でhello_view.pyを作成
def hello(request):
message = "<html><body>表示テスト</body></html>"
return HttpResponse(message)
urls.confの中を以下のように書き換え
# Uncomment the next two lines to enable the admin:
# from django.contrib import admin
# admin.autodiscover()
urlpatterns = patterns('',
# Examples:
# url(r'^$', 'testproject.views.home', name='home'),
# url(r'^testproject/', include('testproject.foo.urls')),
url(r'^hello/$','testproject.hello_view.hello'),
# Uncomment the admin/doc line below to enable admin documentation:
# url(r'^admin/doc/', include('django.contrib.admindocs.urls')),
# Uncomment the next line to enable the admin:
# url(r'^admin/', include(admin.site.urls)),
)
これで開発用サーバを起動して
「http://サーバー/hello/」にアクセスすると以下のように表示されます。
テンプレートの使用
テンプレートを使うとhtmlの定型部分をコードで自動生成するようなことができます。
とりあえずやってみるためにtemplate_test_view.pyを作成。
from django.template import Template, Context
showmeta_template_string="""
<html>
<body>
<table>
<tr>
<td>Key</td><td>Value</td></tr>
{% for item in metadata.items %}
<tr>
<td>{{ item.0 }}</td><td>{{ item.1}}</td>
</tr>
{% endfor %}
</table>
</body>
</html>
"""
def show_metadata(request):
template = Template(showmeta_template_string)
context = Context()
context.update({'metadata': request.META})
return HttpResponse(template.render(context))
本のままですがこんな感じで。あと呼び出し口を指定するためにurls.pyに追加。
# Uncomment the next two lines to enable the admin:
# from django.contrib import admin
# admin.autodiscover()
urlpatterns = patterns('',
# Examples:
# url(r'^$', 'testproject.views.home', name='home'),
# url(r'^testproject/', include('testproject.foo.urls')),
url(r'^hello/$','testproject.hello_view.hello'),
url(r'^template_test/$','testproject.template_test_view.show_metadata'),
# Uncomment the admin/doc line below to enable admin documentation:
# url(r'^admin/doc/', include('django.contrib.admindocs.urls')),
# Uncomment the next line to enable the admin:
# url(r'^admin/', include(admin.site.urls)),
)
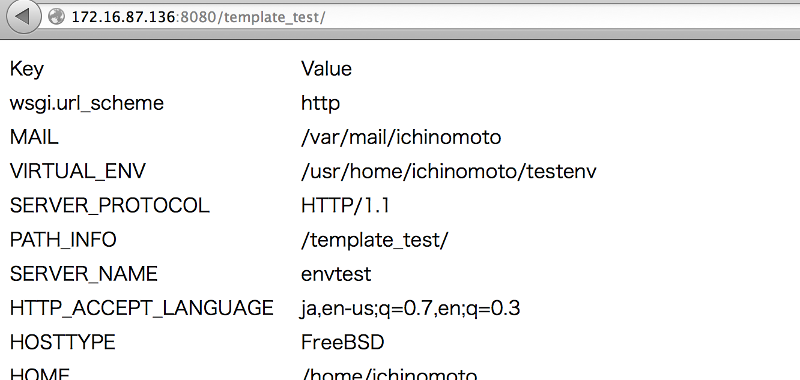
として「http://サーバー/template_test/」にアクセスするとこうなります。
これでテンプレートは使用できていますが、やはり定型部分は分離したいと思うわけでそういう場合は以下のようにします。
settings.pyにあるTEMPLATE_DIRSを探してテンプレートファイルを置くディレクトリを追加します。(前後は略)
# Put strings here, like "/home/html/django_templates" or "C:/www/django/templates".
# Always use forward slashes, even on Windows.
# Don't forget to use absolute paths, not relative paths.
"/home/ichinomoto/testenv/testproject/testproject/templates",
)
コメントのとおり絶対パスで書きます。本によると最後の”,”が無いと扱いが変わってしまうらしいので1行だけの場合にも忘れずにつけます。
記載したパスにディレクトリを作成し、その中にtesttemplate.htmlを作成します。
中身は先ほどのファイルの”showmeta_template_string”の中身です。
<body>
<table>
<tr>
<td>Key</td><td>Value</td></tr>
{% for item in metadata.items %}
<tr>
<td>{{ item.0 }}</td><td>{{ item.1}}</td>
</tr>
{% endfor %}
</table>
</body>
</html>
viewのファイルもtemplate_view_ex.pyという名前で新しく作りました。
loaderを使う部分が増えています。
“loader.get_template”で指定するファイルは上でsettings.pyの中で指定したtemplateディレクトリからの相対パスです。
from django.template import loader, Context
def show_metadata_ex(request):
context = Context()
context.update({'metadata': request.META})
template = loader.get_template('testtemplate.html')
return HttpResponse(template.render(context))
新しくviewを追加したのでurls.pyにも追加します。
# Uncomment the next two lines to enable the admin:
# from django.contrib import admin
# admin.autodiscover()
urlpatterns = patterns('',
# Examples:
# url(r'^$', 'testproject.views.home', name='home'),
# url(r'^testproject/', include('testproject.foo.urls')),
url(r'^hello/$','testproject.hello_view.hello'),
url(r'^template_test/$','testproject.template_test_view.show_metadata'),
url(r'^template_test_ex/$','testproject.template_test_view_ex.show_metadata_ex'),
# Uncomment the admin/doc line below to enable admin documentation:
# url(r'^admin/doc/', include('django.contrib.admindocs.urls')),
# Uncomment the next line to enable the admin:
# url(r'^admin/', include(admin.site.urls)),
)
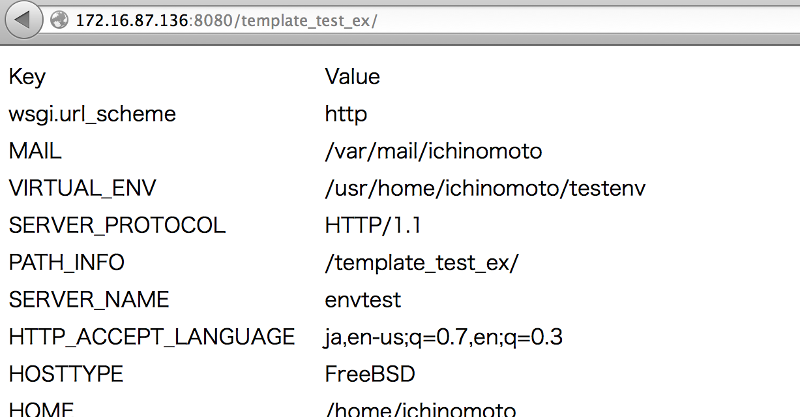
これで「http://サーバー/template_test_ex/」で外部テンプレートを使用したページが表示されます。
テンプレートは継承など他にも便利なことができるようなのですが、ここではそこまで書きませんのでそういうのが気になる場合は本を参照してください。